Friday, December 27, 2013

Computer difficulties.

Hi Friends. I have been having some computer difficulties and they mainly have to do with blogger.  This is a test from our new iPad. Merry Christmas to us.  All of a sudden blogger isn't happy with my browser which hasn't changed. Hang with me while I figure this out. Plus, more consistent blogging is on the New Year's resolution list. In order to say " I told you so" in February you have to check in here to find out if I followed through with my resolution. Also, in the New Year.........another move! Which has the promise of a better internet connection. Wahoo.

Friday, December 13, 2013

Christmas ornaments.

Today I wanted to share the Christmas ornaments that Eli & I made for this year. This idea came from the place where all my great ideas come from.....Pinterest. The tree trunk is a cinnamon stick. Which was the only true expensive of the project. I didn't like the cinnamon sticks in the local grocery store. They weren't hardy enough and most I wouldn't of been able to get hot glue down into for the loop. I bought the Simply Organic brand and was much happier with them. If I was closer to a major craft store I might of been able to find something cheaper there. The branches were cut off a tiny little Christmas tree I bought for $1.99 at a dollar type store. After looking a few places I felt this was my best option for the price. The buttons were in my stash already.
I used a hot glue gun for most of this project and if I didn't want my little man to help out with the buttons I would of hot glued them too. The loop is a Recollections Twine from Michael's. It's a little thicker than Baker's Twine. Although I am a huge fan of Baker's Twine and will never give it up, I like this one. It's nice for wrapping packages. I just placed it down into the cinnamon stick and hot glued it. I also hot glued the branches. For the buttons that Eli helped with I used Zots. Note: I didn't even include him into the project until I was button ready. The ones I did by myself I went back to the hot glue gun.
When I started this project I thought I would use some other materials for the ornaments. Maybe some gems, sequins, and other shiny round embellishments I have, but I decide to stick with the buttons. They are cute and I liked the look. The only thing I would of changed is coordinating the loop color with the buttons. I dropped all the red & white loops in first then the buttons. Possibly, next time I'd do buttons first and use various different colors for the loops. This project cam together quickly and I am happy with the final product. I am hoping I can sneak out another 5 or 6 of them while Eli is at school next week.

Monday, December 9, 2013

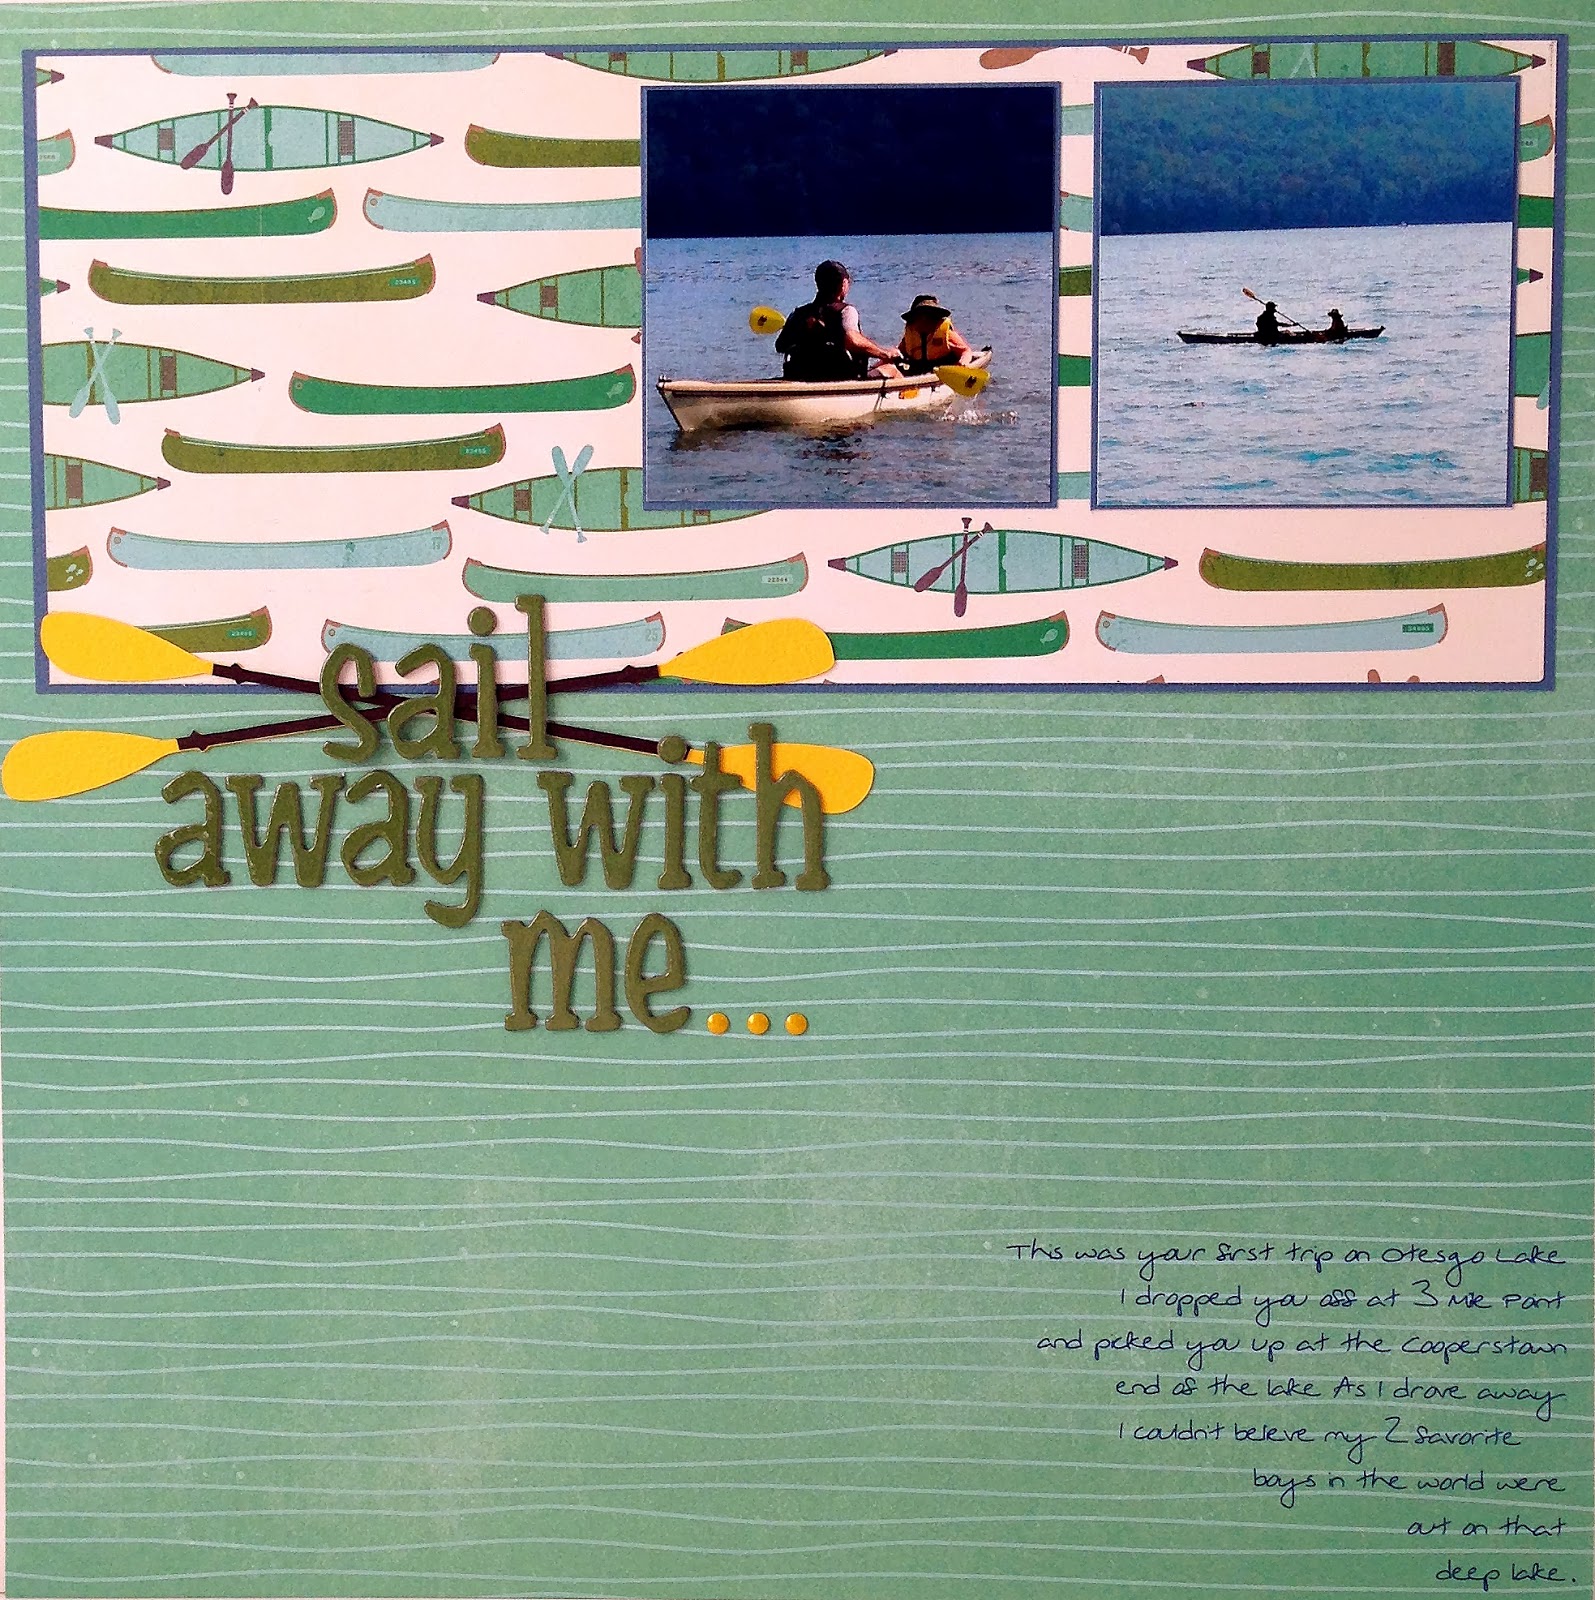
Sail away with me...

Just a quick layout today of my boys kayaking. A very simple page that is very appealing to me. The journaling was done with my Silhouette sketch pens. The oars were also cut with the Silhouette. I cut two sets in two different colors and layered them. I placed the title on top of the oars which created a nice group of elements. This layout is a quick design that would work for many pages just by changing the placement of a few simple things.

Monday, December 2, 2013

Strawberry Fest.

I am in love with this picture of my boy. It really captured his blue eyes and his red shirt looks fabulous too. So, on this page I stayed true to color. Putting everything on a white base makes it pop. To break up my 2 different red pattern papers I slipped a piece of vellum in between them. I used my Silhouette Sketch pens for the journaling and paired it with a title. The wooden veneer arrows are from Freckled Fawn. Which has quickly has become my favorite site for new embellishments. I am supper happy with my layering on this page.

Monday, November 25, 2013

Friends forever!

How did these two messy boys get such a sophisticated scrap book page? I'm not sure. This was a special day spent with friends just before we moved. I guess the emotion of leaving our friends turned this adventurous play date into a simple, classy page. When looking at these photos I try to forget the fact that I had to yell at my misbehaving kid all day. Regardless, these photos captured two friends having a great time. I used two different shades of cream, white, and a fancy black title to dress these bad boys up. I think it works to remember such an important day.

Monday, November 18, 2013

That's a wrap.

Isn't that the cutest little box you ever did see? Recently, I've taking an interest in gift wrapping and present presentation. Don't worry when Christmas comes and I have 782 presents to wrap my interest will be long gone. One of my favorites is to use Baker's Twine. It looks great on every gift by simply matching your color of twine to your paper. I just got a variety of hand dyed doilies from Etsy.com to have on hand for scrap booking, but I think I like them better for present wrapping.
DON'T FORGET: when wrapping a special gift use your tape runner and forget that very noticeable Scotch Tape.

Thursday, November 14, 2013

Catching up.

Which is directly related to the lack of blog post. I've never been this far behind in Eli's scrapbook and I am working to catch up to the present date. Earlier in the year a lot of my time was spent on Piper's scrapbook and it now shows. Thankfully, my sister isn't having anymore children. I prefer to scrap in the present. I've never scrapped something in the past or vintage pictures. I feel life is too busy and keeping up is the best method for me. Not to mention I have a horrible memory and can't do it any other way. When I am behind I feel like my pages don't always get the time they deserve. I won't say they lack quality, but sometimes they lack creativity. I am less likely to try something new and difficult. I also tend to resort to what I know works. Sometimes pages aren't thought out. Which is healthy for me the "planner". I am hopeful in the process of catching up something amazing, beautiful, and maybe even a little unplanned happens in this album.

Monday, November 4, 2013

Trick-or-Tractor

Introducing my favorite farmer! This costume was made entirely possible by my Silhouette Cameo. Without it I would of had a lot more leg work. The box was spray painted John Deere green, of course. The wheels & smoke stack were spray painted black. I used my Cameo to cut a pattern out for the wheels and then cut them by hand out of cardboard. The yellow making up the inside of the wheels is vinyl. Most of the yellow elements are. The grill and John Deere logo are cut out of cardstock. For both the logo and the slow moving sign I backed my designs with cardboard to give them more dimension. I added lights and reflectors to make it more realistic and super fun. We did have a few engineering problems, but I think some of that was due to the rain. Rain and cardboard don't mix! If I has to do it all over again, I would start with a smaller box. I would also work on a better harness or straps to keep it on. The farmers suspenders didn't really cut it with all the movement of my busy boy. The gas can was his trick-or-treat bucket which made the costume really come together. On Friday we had a small Halloween party for the kids. Eli was still able to be a farmer without his tractor for most of the night. Sometimes Mommy is pretty cool!

Wednesday, October 30, 2013

Halloween is here.

This is last year's Halloween. Eli was a scarecrow. This page was made using My Mind Eye's collection Lost & Found Halloween. A collection I had to have, but really have never made anything fantastic with. Mainly, because I am crazy about kraft paper. The above layout is just that. But I'll rave about the costume for days. I cut up grass skirts and sewed them into the overalls at the wrist and ankles. I added a few patches and even a hanky for his back pocket. I also attached the black crow onto his hat. It turned out super cute. I only wish I had someone to hand it down to. He sure was the cutest scarecrow.

Sunday, October 27, 2013

My lil' lion.

This was Eli's 3rd Halloween, but the first I ever scrapbooked. I had this idea that I didn't want to be "one of those" scrappers that was crazy about Halloween paper. So, I went with a non-traditional Halloween page. I liked this paper with his cream and tan color costume. The pumpkins were cut with the Silhouette Cameo and backed with a piece of burlap. The banners and letters were also cut the same way. Note: the bows made with brads. Which is a super easy way to make a great bow.
I am scared to death of the day my boy ask for a big box store costume. That might be my Halloween nightmare come true. Luckily, the power of suggestion still works well with him. And I am smart enough to suggest something that is within my creative reach. The above costume was fun and simple, but still super cute. The lion hat was a gift from a relative that visited a zoo. He had the tan pants and I bought the cream shirt. I added a felt tail with some yarn tassels to the pants. I always like to add a coordinating trick or treat basket. The steak was a dog toy that I hot glued onto a box. I love my lil' lion.

Saturday, October 26, 2013

Apple Cider.

Not only is this one of my favorite Fall pages, it's one of my favorite Fall days. It was an apple cider making, 4-wheel, tractor riding kind of day. And there's nowhere else in the world I'd rather do it. My boy had a blast! When I bought the Tim Holtz tickets I loved them. I tried to fit them in many projects. Finally, they worked on this page. With my Cameo I created a similar looking ticket as a check list of all the wonder thing we did that day. I also cut the apple and apple cider jug out with my Cameo. Both of them were downloaded from the Silhouette Store. What a great day for our family.

Wednesday, October 23, 2013

I heart Fall.


I am sharing another old Fall page today. Yet another page created using Harvest Lane by Simple Stories. Hey, the previous post about my love for this paper company was no lie. I really use this stuff. This page is also one of my better, first attempts at layering. Which isn't too difficult when you so many options of paper you love. This was also the first time I dared to scrap professionally taken photos. Before this I just didn't feel like I was ready. Note: The "family" tag was a price tag on an item I bought at a craft fair. No, it's probably not acid-free. But I am not an acid-free Nazi. Frankly, any yellowing of paper would just make this page look even better.

Sunday, October 20, 2013

Simple Stories.

When I first discovered Simple Stories I felt the same way as I did the first time I discovered Echo Park. I loved everything about it! For me it opened up a window of endless possibilities. The colors and designs fit in line with the type of pages I like to create. Since I mainly scrap our son and the things he does with our family, so many of their collections fit into what we enjoy doing together. Harvest Lane and Summer Fresh are two of my favorite collections. I have created many pages with those collection, but the best part is that I continue to go back to them and use up all the little elements. The alphas, big and small are seen on many of my pages. I just purchased the Smarty Pants collection for out first day of school pics and can't wait to get my hands on it. And I already know Urban Traveler is next in line. The colors are great for any and all boy pages not just vacation pages. I salute you Simple Stories! Thank you for making my sometimes complicated life story so simple to tell.

Saturday, October 19, 2013

Hello Fall.

Fall is my favorite and we've had a beautiful one this year! I've decided to dig out some old fall pages to share this week. On this page I used Harvest Lane by Simple Stories. One of my all time favorite collections. I've used almost every piece in this collection. Pulling out old pages gives you a chance to re-evaluate your work. On this one, the horrible hand written journaling sticks out to me like a sore thumb. I am never pleased with the results when I journal this way. So, I've learned and just don't do it very often. Happy Fall, Everyone. Come back soon for more leaf crunching pages.

Tuesday, October 15, 2013

Cards by Bridgett.

After stepping away from card making for awhile, Washi Tape was exactly what I needed to get me interested again. These two cards show two different ways Washi Tape can be used to make cards. One is very simple. Which works well with the bird tape design. While the bike tape demands a little busier design. I placed the tape in a chevron like pattern. That card states "here to give you a lift" inside. At a later date I might add "get well soon" depending on who I decide to send it to. These cards are easy and fun to make. When sending these cards I'll seal the envelop with a little piece of coordinating washi tape for the finishing touches.

Saturday, October 5, 2013

Cards by Eli.

The other day I snuck upstairs to finish a washi card I had started. It wasn't long before I had a little boy pulling up a seat beside me. I think washi tape is excellent for small crafters. It requires no glue, but isn't very sticky. Plus, little hands can tear it easily. I set him up for success by only giving him coordinating options. Which is a favorite trick of mine. We decided it was a "happy fall" card. Inside I let him stamp "BOO", "happy", and "Happy Halloween." Although I helped, this card was truly made by him. It's a great card for a grandparent. So proud of my little boy.

Friday, October 4, 2013

Sketch Challenge.


I entered my very first sketch challenge. It was a Becky Fleck sketch through A Cherry on Top. I did not win the challenge, but I did receive rewards points just for submitting a page into their online gallery. I heart Becky Fleck and that is what pushed me to give the above sketch a chance. Page Maps and Page Maps 2 were the beginning of my scrapbook hobby. I high recommend these books to any beginner or if you find yourself in a slump. As you can see I didn't stray too far from the sketch. I did omit the journaling which I have been in a bad habit of lately. I have added one little thing to the page since the photo was taken. I was rushing for the deadline and could not for the life of me find these John Deere epoxy stickers I knew I had. With the recent move I am having trouble figuring out where these random little things are. Since the challenge I found them and added one John Deere logo sticker just left of the flower. Although I do not do it often, don't be afraid to go back to your pages to add or remove something if you want to. Sketch On, Ladies.

Wednesday, October 2, 2013

Hexagons.

Just wanted to share this bright cheery page to wake up your eyes this morning. Hexagons are pretty popular in the scrap book world right now and I was ready to give one a shot. Most are using smaller hexagons to create a background or using them on cards. I needed a way to crop out the unpleasant parts of the above photos and thought hexagons just might work. I paired the white page, with bright rainbow paper and black letters. I used 6 different styles of black alphas to mix them up and keep it fun. I think it worked!

Tuesday, September 24, 2013

"Working."

I am "working" in the "office" today trying to finish up a page. What do all those quotes really mean? If you know the answer don't tell my husband. I am excited to finally be able to catch up on Eli's scrapbook. It's almost October and I like to keep up as much as possible. I have found this is the easiest way for me, because I have a horrible memory. Even when I started scrap booking I never went back and scrapped the past. It's hard enough to keep up let alone work back in time. This method works well for me, but everyone is different. Regardless of your method, just scrap something. You'll always be making progress.

Friday, September 20, 2013

Summer colors.

This was one of the last pages in Piper's album and one my favorites. I scrap lifted this layout from Pinterest and quickly put it together. I shouldn't tell on myself about how fast this actually came together, because I think it looks good enough to seem like a days worth of work. This page was created entirely from Summer Days by Echo Park. A collection that has been very good to me. With only scraps left this was the perfect page for it. I think the bright summer color against the white background work wonders for this page. And this little summertime cutie. NOTE: the chevrons or arrows.......which are both super hip and trendy right now. They are actually photo corners from the collection pack. When turned this way and being directed at the edges of the photo they seem to trick the eye just enough to think they are chevrons or arrows. Kudos Bridgett! Sometimes you're super hip and trendy!

Monday, September 16, 2013

ebay jackpot.

I feel like I've hit the ebay jackpot! I ventured out into the world wide web in search of storage solutions. I just happened across the above ribbon rack and decided it was the one for me. I immediately fell in love with it before it was even all the way unpacked. It was handmade by Geppetto Creations. It is beautifully made with a veneer plywood so it's smooth and won't snag your ribbon. It can be hung on the wall, but for now it's sitting on the floor of unfinished scrapbook room. I love being able to see my ribbon options instead of having to always dig through them. This ribbon rack is so functional. The price is very reasonable for the love and quality put into this piece. Ken, the Geppetto himself shipped the item very quickly, packed it with care, and is an excellent communicator. My guess is that Geppetto might have a special place in his heart for a scrap booker. He even included a free little gift in my order. I am super happy with this purchase and now have an excuse to buy more ribbon. Thanks Ken!

Wednesday, September 11, 2013

Baby gift.

I have been using my scrappin' time to work on this wall hanging, lately. The frame is 11x14 and the picture opening is 8x10. I created it using the Silhouette Cameo software. This piece is printed on smooth white card stock. Always remembering to change your printer settings to BEST QUALITY before printing your final copy. For best results I like to print these with a fairly new ink cartridge. This is the 4th baby wall hanging I have done.....2 boys & 2 girls. I am able to copy & paste from the original one for sizing and most importantly the dots separating the facts. The spacing and placement of the dots was the most difficult part of the first one. So these can go together relatively quickly now, by adding in the new baby's stats. My friend told me the nursery was going to be grey, teal, and lime. From there I just mixed the colors until I was happy with the overall look. I picked a football to fill in the box where I always place some type of image. Mixing the fonts is a must with a project like this and one of my favorite things to do. I can't wait to give it to the new Momma this weekend.

Tuesday, September 10, 2013

Love This.

I am proud of this page because I cut all the embellishments myself. I tend to use mostly store bought embellishments so when I taken the time to make my own I am usually pretty surprised with the results. I placed the flourish corner piece first and started layering flowers on top of that. I used brads to hold my flowers together and even added gems on top of them. Remember to fold you flower petals up to give them depth. This also helps if you are layering them to sneak them in close together. I should be famous for always losing the dot to the I! It seems to always happen to me. I am not the type of scraper that will get the cutting machine back out and load it with more paper just for the dot. I like to a gem and be done. This page was created using Tim Holtz paper. A random stack my sister bought me so had to fit it in her baby's album someplace. What an awesome sister!

Thursday, September 5, 2013

Officially Moved.

We did it! After a few exhausting days of unpacking, rearranging, and figuring things out. We are in our new home, for now. Everything truly went as well as possible. And the little boy has done a wonderful job settling into his new home and school. He hasn't had any sleeping problems, probably because he's had some busy days too, which was one of my big worries with this move. I am pretty proud of him and my husband too.
Now, the important stuff. Projects are lining up and I think they are calling my name. I am itching to do something creative. A few positive things have happened with the move in regards to my paper addiction. The little boy is attending pre-school 5 day a week. Which is huge to this SAHM who hasn't ever had ample amount of free time. This gives me every morning to do the things I love until 11:40am. Wahoo! In the move I also acquired a scrapbook room. It's a long room with low ceilings in which I can only stand up in the middle of the room. But who needs to stand to scrap? All my stuff has made it to the room, but hasn't been unpacked and organized yet. The wheels are turning about storage, organizing, and making the room functional and awesome. This house is only a rental so I am not ready to invest in any big ticket items, but I am dreaming of the next space already. Maybe just a few small items to make it comfortable. I think I start with small glass jars for my buttons.

Monday, August 26, 2013

We're moving!

Nope. Not the blog. The entire family. My husband has accepted a new job and we are packing everything up and going for it. We've waited all summer long for the big moving day and it's finally here. Both of the special men in my life will start their new ventures on the same day next week. We will have very little time to get settled in before that happens so I'll probably be on a blogging break. We are excited about the all the newness in our life, but also hesitant. Our home hasn't sold yet, but in order to take this opportunity we're stepping out on faith and making it happen. We are prepared for busy times taking care of two homes, but hope it won't be for long. Please send us all your happy real estate thoughts. The cutting machine has now been disconnected. The paper has been filed away. And my scissors are packed.

Sunday, August 25, 2013

Product Rave.

I am in love with these wood chips from Freckled Fawn! I discovered them through my blog hopping travels. I had never placed an order with Freckled Fawn before so I didn't really know what they had to offer. I bought three sets. The clouds, the speech bubbles, and the arrows. I would of bought the stars too if they weren't sold out. Last night I used several pieces from the cloud collection on this layout of my boy on a very big cool old slide. I can't tell you enough that I love them. After I finished the above page I still needed a petting secession with my new wood chips. I opened the other boxes and looked them all over before I decided to store them in a cute little see through box. You should definitely get some.

Friday, August 23, 2013

Black & White.

The above page is a similar idea to the previous white page post. This time I added the use of white, black and the tone in between, gray. With a very square instagram print I chose to center my photo on top of the pattern paper grid. I used a piece of vellum under the photo to soften the edges. The playing cards spelling out M.O.M. and the wording stickers are both products of idea-ology collection by Tim Holtz. Notice: just under the green key is another playing card from that same collection using the back of the card for it's design. My favorite part of any page is adding the last few fun details. I started with the pearls and the black crystals on top of the black polka-dots. A trick I use often. I always love to layer the same color on top of any polka-dot. I attempted to use many other elements to add that special something to the page until I finally settled on the above green key. I loved it immediately! So, let's rename this one, black and white with a punch of green.


Thursday, August 22, 2013

White Page.

After seeing many white pages floating around in cyber space I knew I wanted to give one a try. I believe the thing that makes this page successful was waiting for the right picture. Previous to this, I made a white page for my son's album. I used bright brilliant Easter egg dying photos. It kind of worked, but not like this photo does. I mixed many different textures of white to create this page. I added the large bow which gave me a hefty knot perfect for the pins. I have used similar pins with Baker's Twine and smaller ribbons, but I am happiest with this result with the larger ribbon. I am pleased with this page and happy to check it off the list.

Monday, August 19, 2013

Gradient.

With all the paint swatch projects on Pinterest I was ready to create a page using a gradient of colors. I kept the process simple by selecting my colors from the pink cardstock I already owned. The title and loop-de-loop design is a nod to the crawling stage of babies. I chose a white background to really show of the gradient of pinks. I think this is a simple page with a bold statement.

Sunday, August 18, 2013

It's the birthday girl.

And she has a beautiful highchair banner. These babies always get photographed in their highchair on their 1st birthday so, why not decorate it? This banner came together pretty quickly the day before her party. I used the Martha Stewart Scoreboard to make the rosettes. I always use a hot glue gun to make my rosettes. I used my Cameo for the rest of the cutting. I cut the light purple letters first and wasn't happy with the way they looked. The letters blended in and needed something to make them pop. Using the offset feature in the software I went back and cut the dark purple letters. A pretty banner for a pretty birthday girl.

Friday, August 16, 2013

Happy Birthday Piper Eleanor.

Today is Piper's 1st birthday! And that means I get to give her & her family the secret scrapbook project I've been working on for more than a year. I will probably be the most excited person you've ever seen at a 1 year olds birthday party. I feel blessed to have this little peanut in my life and honored to make her this album. It was such a pleasure to work with her beautiful face this past year. Recognize this layout? Refer back to an older post named "Collection pages." It's the exact same layout with a few different elements. It's kind of like the girl version and boy version. This page was created using Time for Spring by Fancy Pants Designs. I finally got to use that owl ribbon I've had for a long time. I loved it when I bought it and have tried to use it on many other pages, but it never made that finally cut. I think it fits here perfectly. Warning: pink explosion ahead! I have many more Piper layouts to share.

Wednesday, August 14, 2013

Secret Scrapbooking Projects.

Are usually gifts and might be my favorite projects to do. I've made a few baby gifts and a few birthday gifts. I also documented my niece, Stella's first year of life. I gave her family a complete scrapbook on her 1st birthday. Hint. Hint. To what this post is truly about and why there has been a lack of new layout photos here on the blog. I am super excited that this secret scrapbooking project is coming to an end. I will also be happy to share all my goodies with you very soon. Next week will be busy around here so come back soon & often.

Saturday, August 10, 2013

Birthday Girl #2.

We have another birthday to celebrate next week. Piper. our fair baby is turning 1! The party will be at Momma Cece's (practically at the fair) so it was fitting to go with a fair theme. We agreed on carousel horses and girly colors, because it's her 1st birthday and we didn't want to go to circus like. I designed this invitation in Silhouette Studio using the print & cut feature. It's long and skinny and fits in a business envelop. Most of the hard working being done with the printer. I believe strongly that it doesn't pay to print at home, but I also have difficulties getting Studio files out of the program. When needing a large number of invitations, my solution is to print one and run to Kikos. You can't beat their price compared to buying new ink cartridges for your home printer. I printed all copies with the registration marks so I could cut out the ticket shape on my Cameo. I think it's perfect for our fair baby. More birthday post to come......stay tuned!

Wednesday, August 7, 2013

Kayaking.

The last Project Life related post for awhile. I grouped 3 Project Life frames plus my journaling together to create this page. The frames were all downloaded from Silhouette Store and cut with my Cameo. The more simple frame with nothing in it is actually the "happy" frame with the text cut out. The journaling was done using the sketch pen feature on the Cameo. I do not have the capability of printing on 12x12 paper. So that's when I tend to use the sketch pens most often. I arranged the frames on the computer screen to insure the correct placement for the journaling. I love the simple look of this page and it wasn't a time consuming page to complete.

Tuesday, August 6, 2013

The back side.

Unfortunately (or fortunately), your next page will also be divided. I wish I could figure out a solution so it wouldn't have to be, because then I'd use these page protectors more often. It's seldom that I have back to back pages that will work with this type of design. This is Eli's first page of his album. He had eye surgery in January. I usually only scrap happy life events and I considered this one of them. That eye gave us so much trouble and on this day our troubles were ended. The "big day" Project Life frame was downloaded from the Silhouette Store. 2013 has only improved from there.

Divided Page Protectors.

This is my cover page for this year using a divided page protector which are most commonly being used for Project Life albums. I am very happy with the final result considering it's something new to me. I used an Echo Park line called Photo Freedom which is also where the page protector came from. My main focus for my cover pages is always the year, but I also like to get Eli's name in there somewhere. Note: I had to get creative to come up with enough E's for my wording. "The best is yet to come" was stuck in my head and it's what I wanted to use. Instead of changing it I used an "&" sign for one E and a C with a line inserted in it for the other. I am completely fine with this method, because I have learned you only have to trick the eye when working with alphas.

Wahoo....

My replacement blade came in the mail today and my scrapbook machine works. I am back in business!

Monday, August 5, 2013
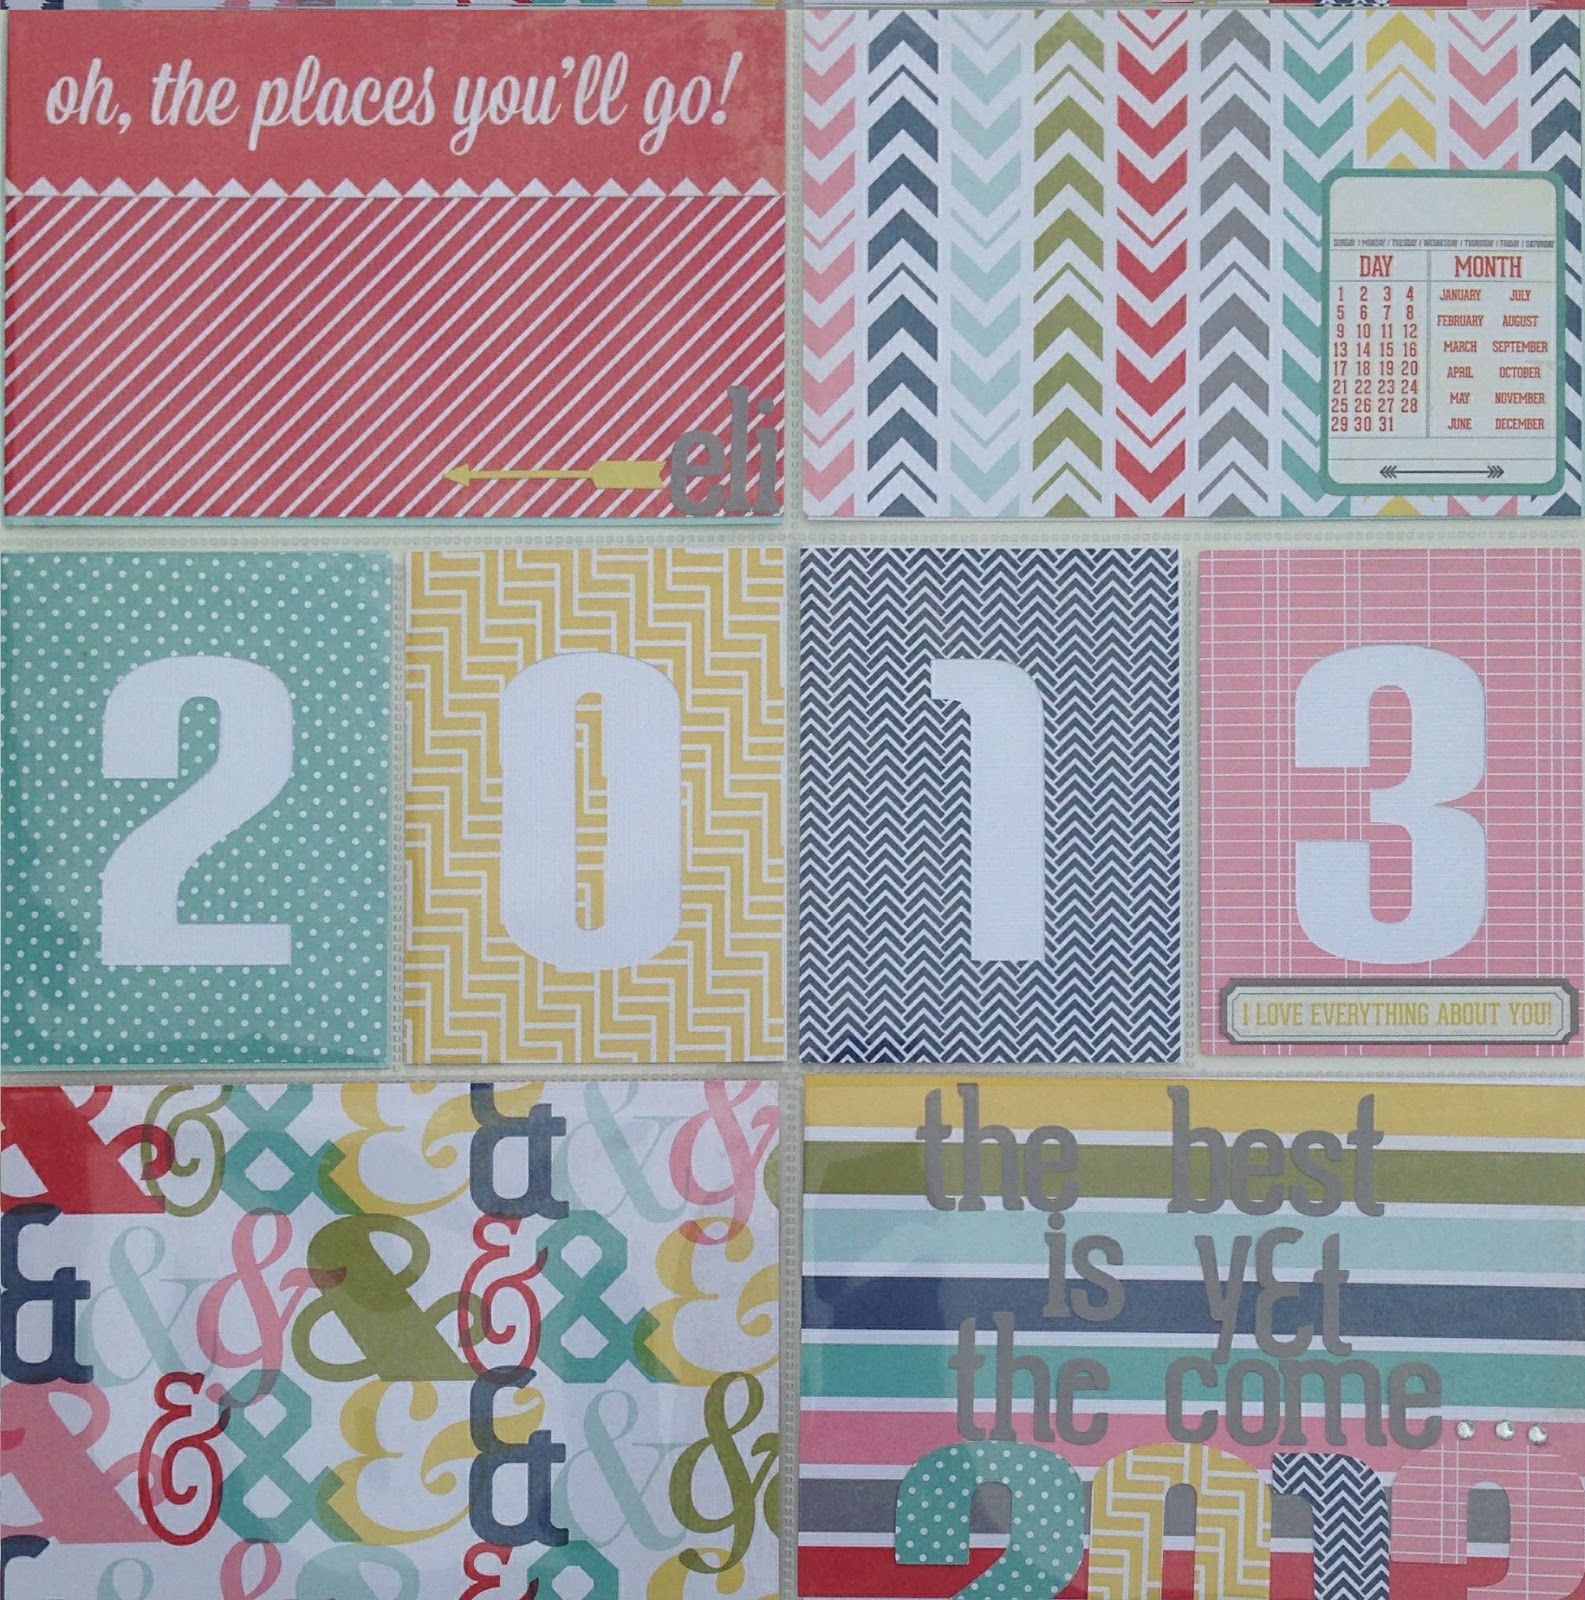
Project Life.

I don't scrapbook in true Project Life fashion, but that doesn't mean I'm not going to utilize their awesome products. I've started to slip in a divided page protector here and there. I think it changes up an album in a fun way. It works nicely for a large amount of pictures or pictures you don't want to crop. This years album actually starts with a divided page protector for my cover page. (I'll post that tomorrow.) So many scrapbook lines are putting out really fun journaling cards and frames. All of these items can be slipped into any page. The Silhouette store has a wonderful selection of frames and cards to download. I just finished a layout using Project Life frames arranging them in a grid-square pattern. (I'll post that the day after tomorrow.) Even if you don't want to scrap in a weekly Project Life fashion, don't overlook the elements for your pages.

Sunday, August 4, 2013

Happy Birthday Stella Rose!

We have a birthday to celebrate today. My beautiful niece turns 3. All she wants is a pink cupcake birthday party. I was hoping to make a "pin the sprinkle on the cupcake" game, but my Cameo had other ideas. Instead I turned this incomplete project into a birthday sign by adding some alphas. A little silly, but it will work for a pretty forgiving audience. It should be a fun day, especially for the little ones.

Saturday, August 3, 2013

Replacement blade.

All projects are put on hold until the UPS man drops off a box with a smiley face on it. And then I will smile too. I was having difficulty with my scrapbook machine the last few days. I actually thought the whole thing was broken, but now I am convinced that I just need a new blade. I am a professional internet shopper, but refuse to pay extra for faster shipping. This time I wish I had! I am putting this time to good use by planning out a few projects. I have also placed a paper order and ordered some instagram prints. I order them from Persnickety Prints. It's a service I found on the internet and was really happy with my prints last time. They print the photos square with many size choices. I recommend 4x4. Seems like I have some instagram pages in my future. So needless to say, I will be very happy next week when ALL my packages arrive.

Friday, August 2, 2013

Up, Up, and Away.

I knew the second this picture of my blue eyed boy popped up on my camera screen what I wanted to do with it. The angle of the photo with him holding the kite string was perfect for fabulous kite page. I cut the kites and their bows out with my Silhouette Cameo. I also cut the photo that became the blue kite with my machine. I don't always do this because I am too afraid my photo might get messed up, but this time I went for it. I am very happy how it turned out. I planned to mat my kites a little more center on the bright colored card stock, but when I walked away they shifted and I thought it was more fun this way. I used black & white Baker's Twine for the kite strings and playfully tacked them down with a Mini Glue Dot. I am super happy with the results of this page. I think it's fun and love the primary colors with the white background.

Thursday, August 1, 2013

Working with vinyl.

Isn't my favorite thing. Actually, I have a love-hate relationship with the stuff. I love the fact that it opens the door for me to create so many more things. But hate the sticky transfer process which seems to always cause me so many problems. I've made a few signs, water bottles, cups, and added our son's name to his bento boxes. I placed "Welcome" on our wooden door which I am super happy with. For the end of the school year I made the teachers clipboards with their name on it. All these small projects were practice for the growth charts I posted yesterday. Just the shear size makes the placement more difficult for me. Most of my anxiety comes from the fact that I hate to waste. I don't like to waste scrapbook paper and vinyl is even more expensive. I also feel like vinyl projects are more difficult to salvage once you've made a mistake. I have thought about doing a large wall piece for my niece's bedroom, but don't feel like I'd be happy with the final result at my current skill level. I plan to keep doing more small projects and maybe just someday I'll fall in love with vinyl.

Wednesday, July 31, 2013

Growth Chart

This is the first project I had ever seen on Pinterest that I knew I wanted to re-create. Yes, life before Pinterest (LBP) was lame. Fast Forward to now having the project done and feeling happy about the results. One growth chart for our home and one for my sister's home. The trees that this wood came from stood tall on my Grandpa Kilmer's farm in Hamden, NY. Where I grew up and a place that holds a special spot in my heart. My Dad cut, planed, and sanded the wood for me. Once I got the wood in my hands it was stored for a while until I was ready to brave a large vinyl project. I stained the wood with a natural stain, because I barely wanted any color at all. But felt like I needed a little something to protect the wood. The first ruler I transferred the vinyl in one piece and second one was done in many pieces. Not the easiest or my favorite part of the project. Thankfully I had an extra set of hands for that part. I chose a matte polyurethane to seal the vinyl and added flush mount hooks to the back.
I hope these growth charts hang in our homes for a long time to come. Tracking the beautiful growth of our children on our Grandpa's wood that our Dad's hands worked so hard on. This 3 generation project makes me proud of where I came from and excited about where our son is going.

Sunday, July 28, 2013

Photos.

I am not really happy with the photos of my scrapbook pages. I feel like the photos don't do them justice. I must be missing something, because I've been trying to get better pictures and I just don't feel like I am there yet. I've worked on lighting and really getting above my projects. I've also started taking them with my iphone, because my big camera is just too difficult to get the exact angle. Next week I am attending a webinar on this exact topic. I am hoping this blog has better project pictures in it's future. Stay tuned to find out.

Saturday, July 27, 2013

Collection pages.

This page was created using elements mainly from one collection. It's from My Mind's Eye, Kate & Co. called Oxford Lane. I only added a few things from outside the line. I added the green cardstock that my photo and banners are mounted on, the two yellow sunshine pins, the small yellow alphas and the yellow & green dots. Staying within the collection gave this page a cohesive look, but still allowed me to mix a ton of patterns. It's a fun way to get a really trendy page without sorting through every piece of paper that you own. I like to do these pages because they usually come together pretty quickly. But it's not the only type I could do, because I enjoy picking out paper and making own mix. These colors are perfect for my boy! And I was even able to add in two floral patterns without it seeming too girly.

Thursday, July 25, 2013

Fair Week Fun.

First, a little more about me....I grew up living right next to the Delaware County Fair Grounds. The best agriculture fair in New York State. As a child I entered 4-H projects in the fair and had one heck of a time. As an adult it's a way to see people I haven't seen in years and re-live my childhood through our Son. It's always held the second full week in August so be prepared for more fair related post.
This is last year's fair page. On this fair day Eli stomped around the muddy fair grounds in his rain boots and yellow wind breaker. I created the roller coaster slope myself so it's not perfect, but it's exactly what I wanted. I made the flags out of toothpicks and washi tape. And placed my photos in photo strip fashion. A Baker's Twine bow and pins hide my corner where a couple of elements came together. The bingo card is from  Simple Stories.
See you at the Fair!

Wednesday, July 24, 2013

Scrapbook Style.

Scrapbook style can mean so many things. Yesterday I posted a page that was created "YEARS" ago. Yup, that's right. I scrapbook in chronologically order. There is no other way for me, it's just how my brain works. I scrapbook from January to January, always starting with a cover page. Some people like to scrapbook from birthday to birthday. I kind of did that when I scrapbooked my niece's 1st year of life. It was a secret project and gift I gave her family on her 1st birthday. One of the most rewarding gifts I've ever made. But for my Son I always start a new book when the new year starts. Which means Christmas usually wraps up his' books quite nicely. Others like to do books just about a certain subject. There are the crazies that just scrap Christmas(Ugh), and those that are crazy about Halloween paper, and the travelers. I like the idea of a family vacation album.....if you vacationed at the same spot every year. My brain can almost allow that to happen. I'd love to be able to scrapbook random pictures from different times and place them in random order, but that will never happen!

Tuesday, July 23, 2013

Look at that face.

I hope you like! If you're hanging around here you'll see a lot of it. He is my favorite subject. This page goes back a couple of years. It's probably the first page I did and thought......Wow, I might be good at this, I am able to create something pretty cool, I might have some style, and maybe just someday I could hang with the big dogs. I also wanted to share this page to remind myself to do another list. It's always fun to look back at. Some of the things on this list are his size, what he hates(brushing his teeth), what he loves(water), that he helped Mom with the mixer for the first time, and of course the last thing is that Mommy & Daddy love you very much. This years goal is now set as another list about this handsome guy.

Monday, July 22, 2013

It's a new day.

Today was the first  morning I woke up with my Blog Badge on. Similar to a sheriff's badge, but with a little more glitter. I also woke up excited so I hope I can keep this blog updated and full of cool stuff. Instead of diving into a million new projects (just for blogging sake) I want to actually better this page. So, I'll be posting older projects I've worked on and just happened to take photos of. This will give me practice and make it easier for me to learn this stuff.

Sunday, July 21, 2013

Party Pak.

Just sharing one of my favorite small projects to get this blog started off right. I made these Party Paks for our Son's birthday B-B-Q. I cut a brown paper lunch bag with my decorative scissors, stuffed it with a napkin, eating utensils, and a straw. I used my Silhouette Cameo to create the "Dig In!" tag with the print & cut features. I added colorful Baker's Twine to tie it all together. Lastly, I put them in a cute basket and placed them at the beginning of the buffet line. Everyone just had to grab their Party Pak and Dig In!

Am I a blogger?

Looks like I might be! And this page could soon be full of my creations. This is just a test...